
Welcome to HubCC coaching
Hi, and welcome to our group coaching. Ric, Alex, and Neil, are really happy you’re joining CycleCoach. We wanted to provide you with some idea of how the coaching looks, and what you need to do. We’ve already received your questionnaire, so Coach Ric is now able to workout which group would be best for you. Of course, you may also have a specific group in mind, so just let Coach Ric know!
Very shortly, you should receive an email from our coaching platform, Final Surge. Here you’ll be able to set up your athlete account, start entering some key metrics and make sure you can contact your coach there.
To help guide you through the set up process, please follow the guidelines below. Of course if you have any problems, or are unsure, then just contact Coach Ric.
Sign up on FinalSurge
Once you click your email invite you’ll be sent to Final Surge and see something like this

Fill in your details (not mine!) and you’ll be asked to accept CycleCoach’s invite

Now you can enter all your details. The more you enter the better we can get to know you and increase your fitness. You have a choice of which day the week starts (Sunday or Monday) and how you see times and dates etc.


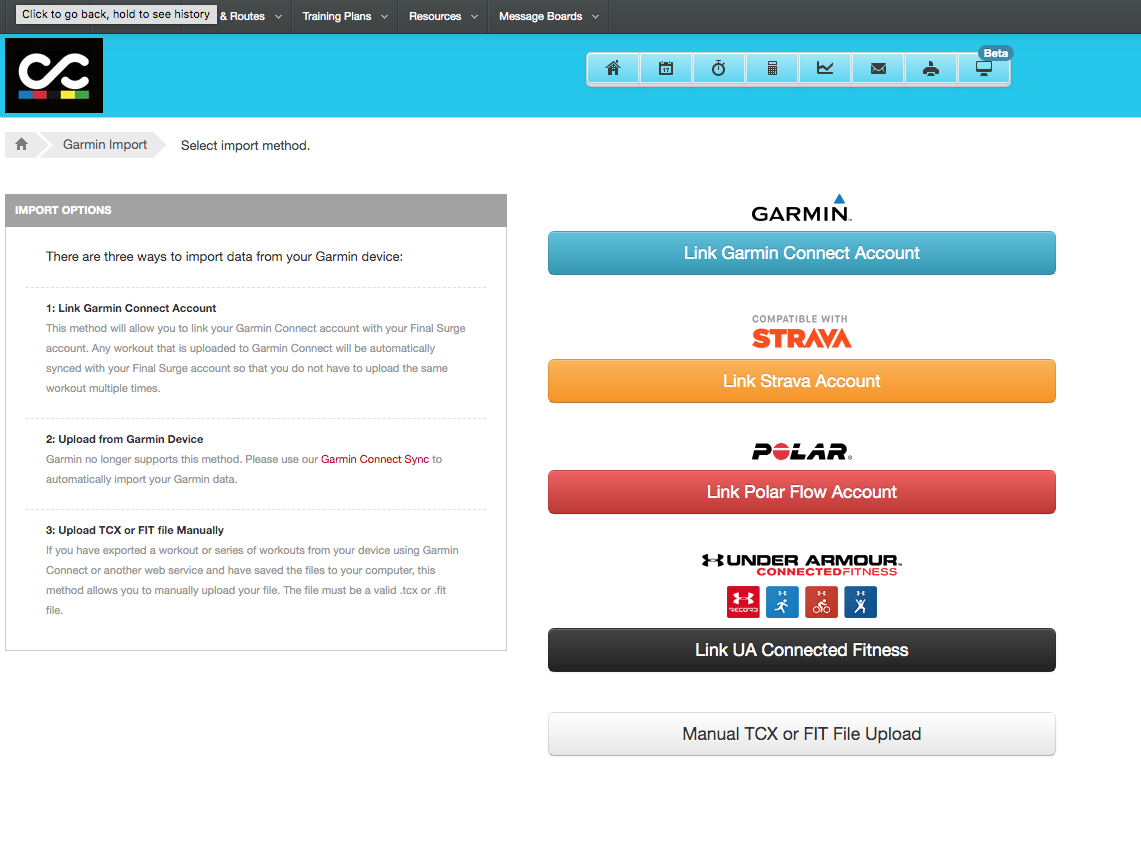
Once your settings are complete, clicking at the top left over workouts will drop down a menu. Select Garmin/device upload. You can connect your Strava/Garmin account etc and your training will be automatically imported into Final Surge

Now it’s time to set your training zones. There are several or more options for this, but don’t worry, we can get you through this! It’s entirely possible you don’t know what your MAP or FTP is, but don’t worry, you’ll be testing in the first week(s) of training, so you’ll have a good idea after that. However, if you want to set your zones now, select Workouts (again), HR/Power/Pace Zones. We’ll set power zones. You can set your FTP (or estimate it), and then choose Andy Coggan. Or, from the same drop down box you can select CycleCoach MAP if you know your MAP from a MAP (ramp) test.


Final Surge has two modes. Currently, you’re in the ‘old’ mode, they’re transitioning to a new beta interface, which for many aspects of Final Surge you can use. We prefer the beta interface. Swap by selecting Beta Platform!

You’ll now be taken to your Workout Calendar, where you can see your training. It’s entirely possible that at the beginning while your coach collects more info about you, that it’ll be empty. Don’t worry, it’ll be full soon. It’ll look like this


Within each training session, you’ll see a duration to the training, and a brief description. In the right hand column, you’ll see a weekly aggregate time for each type of exercise you do (e.g., cycling, running, swimming, strength&conditioning, etc). In this instance, the first week has 4hours 15mins of cycling and 30mins of strength and conditioning). If you hover over a workout (or double click it) a more in-depth description will appear.
On the top left of the beta interface, there’s an option to open more options out. Click the arrow to the right of your name. Some of the options will keep you in the beta interface. Those that require the old interface will open a new tab on your computer.

Your coach will want to send you messages on occasion, and you’ll also get notified of various things happening in Final Surge (such as your coach emailing you, or writing a comment on one of your workouts. Final Surge has its own email system (although you can also reply directly from your own email client).


One of the great aspects of HubCC Coaching is the ability to chat with others and share your rides that you’ve imported from Strava etc. You use our new chat area for this in the Geneva app and others can see your ride and details. Geneva is a desktop/browser/phone app and your invite is created via this link https://links.genevachat.com/invite/203076e3-7fa7-4eab-90fb-25e820c5742c. Geneva requires your phone number.

Once you’ve had your Training Plan added to your Workout Calendar, you’ll find many of your Zwift workout files either directly attached or within the Files and Resource section.
For our newer Coaching Plans, such as E-racer/E-fitness/E-sportive, your Zwift workouts will be attached to your plan. These can be found here. Click Training Plan, then click Plan History, then click the name of your plan (in this instance E-Sportive weeks 1-4), where you’ll now be able to see the attached set of zipped Zwift files. Click on them to download them.


Once you’ve downloaded the zipped file, you can unzip it, and put the workout files into Zwift. Instructions for doing this are here
Once you see your workout calendar you’ll see many acronyms for your training session. Below is a list of common training sessions, what they mean and their benefits.
R - Recovery
Recovery rides are ridden at an intensity of Zone Recovery. The route should be as flat as your environment allows (if you live in a hilly area the ride could be completed on rollers / indoor trainer), however, if an occasional hill is met, then these should be ridden as conservatively as possible. Cadence is moderate (~ 75 – 90 revs/min) with gearing typically low (e.g., 39 x 19 – 17). The aim of recovery rides is to speed recovery after consecutive days training, or hard sessions. Typical duration of this session is usually ½ to 2 hours.
LR - Long Ride
Long rides are ridden at an intensity of Zone 1. Hills should be kept to a minimum and steep grades avoided (avoid gradients > ~ 4 – 5%) wherever possible. When going uphill you may stand or sit, whilst keeping intensity fairly low, up to Zone 4. Avoid hills that take > 10 minutes to complete. Cadence is moderately high (~ 85 – 100 revs/min) with gearing fairly low (e.g., 39 x 17 – 15). The aim of long rides is to increase base endurance, and maintain aerobic fitness. This session is also an excellent way of learning to eat whilst training. Typical duration of this session is usually 1½ to 7 hours.
SR - Steady Ride
As long ride, but shorter!
ET - Endurance Training
Endurance training rides are ridden at an intensity of Zone 2. Terrain can be either flat, or include moderate hills (grades to 6%; up to ~ 5 minutes in duration). Intensity on climbs is up to Zone 6 and may specifically be specified in your training. When going uphill you should endeavour to remain seated. Cadence is moderately high (~ 85 – 100 revs/min) with gearing fairly low (e.g., 39 x 17 – 14) on the flat, and keep cadence moderately high (70 – 90 revs/min) when going uphill. The aim of endurance training rides is to increase base endurance, improve aerobic fitness, and forms the core of an endurance cyclists training. This session is also an excellent way of learning to eat whilst training. Typical duration of this session is usually 1 to 4½ hours.
MIET - Moderately intensive endurance training
Moderate intensity endurance training rides are ridden at an intensity of Zone 2 – Zone 3. Terrain can be either flat, or hilly (grades to 10%; up to ~ 12 minutes). Where the entire route is (completely) flat the intensity is (mainly) Zone 3. Intensity on climbs is up to Zone 6 and may specifically be specified in your training. When going uphill you should endeavour to remain seated. Cadence is moderate (~ 80 – 90 revs/min) with gearing moderate (e.g., 39 x 15 – 53 x 16) on the flat, and keep cadence moderate (65 – 80 revs/min) when going uphill. The aim of moderate intensive endurance training rides is to increase ‘threshold’, and improve aerobic fitness. It is both mentally and physically demanding. This session is also an excellent way of learning to eat whilst going hard. Typical duration of this session is usually ½ to 3 hours. Frequently, MIET sessions are included in other sessions.
MGR - Moderate group ride
Moderate group rides are ridden at an intensity of up to Z4. Terrain is varied, and dictated by the group. When doing a ‘turn’ / ‘pull’ do not exceed Z3. If necessary, drop off the back of the group, and wait for the group to slow so as not to exceed Z4 on e.g., hills, increased speed, etc. Cadence can be varied during the session, and you may stand or sit when going uphill. The aim of moderate group rides is to increase base fitness, incorporate bike-handling skills, and also for their social aspect. This session is also an excellent way of learning to eat whilst cycling. Typical duration of this session is usually 2 to 7 hours.
RPI - Race pace intervals
Race pace intervals are ridden at your perceived idea of ‘race pace’ (e.g., Zone 4/5 or 10 / 25 mile TT effort). During your ride accelerate quickly (but not sprinting) to the required effort, and then hold the effort as required. Ride easy at Zone Recovery for 5 minutes to recover, and repeat as specified. These intervals should be performed on flat roads. Cadence is high (95 - 120 revs/min) during the intervals. During certain sessions (e.g., LR, ET) it is beneficial to include race pace intervals. In a group situation, you should drop off the back off the group, and ‘catch’ back up again during the interval.
TTI - Threshold tolerance intervals
Threshold tolerance intervals are ridden at an intensity of Zone 4 to Zone 5 (depending on the duration of the interval). Terrain can be either flat roads, rolling roads, or generally on an indoor trainer, using your race specific (TT) bike. Accelerate quickly to the zone and hold the target intensity for the specified duration. Each interval begins as you accelerate, not when your HR reaches Zone 4. Recover for 1-to-5 minutes, at Zone Recovery. Cadence is moderate (~ 85 – 95 revs/min) with gearing fairly high (e.g., 53 x 18 – 15) on the flat, or cadence high (up to ~95 revs/min) when going uphill. The aim of threshold tolerance intervals is to increase maximal aerobic power, VO2 max, raises threshold (relative, and absolute), and are very beneficial.
API - Aerobic power intervals
Aerobic power intervals are ridden at an intensity of Zone 5. Terrain can be either flat roads, uphill, or generally on an indoor trainer, using your race specific bike. Accelerate quickly to the zone and hold the target intensity for 4 minutes. Each interval begins as you accelerate, not when your HR reaches Zone 5. Recover for 4 minutes or the specified duration, at ZRecovery. Cadence is high (~ 95 – 105 revs/min) with gearing fairly large (e.g., 53 x 16 – 12). The aim of aerobic power intervals is to increase maximal aerobic power, VO2 max, raises threshold (relative, and absolute), and are very beneficial.
MAP^2 - Maximal aerobic power intervals
Maximal aerobic power intervals are ridden at an intensity of MAP, on an indoor trainer, using your race specific bike, with a power meter. Accelerate quickly to the zone and hold the target power for 30 seconds. Spin easy to recover at ZRecovery for 30 seconds. Each interval begins as you accelerate. Cadence is high (~ 100 – 110 revs/min) during the interval, with a large gear (e.g., 53 x 15 – 11). The aim of aerobic power intervals is to increase maximal aerobic power/VO2 max, and is very beneficial.
Hateful MAP - As above but a much greater volume
LTI - Lactate tolerance intervals
Lactate tolerance intervals are ridden at an intensity of Zone 7, on (generally) flat roads, or an indoor trainer, using your race specific bike. Accelerate quickly to the zone (HR will not respond rapidly enough to necessarily reflect the effort) and hold the target effort for 30 seconds. Spin easy to recover at Zone Recovery for 30 seconds. Usually, LTI are performed in sets. Between each set recover at the Zone Recovery to Zone 1 for 5 minutes. Each interval begins as you accelerate, not when your HR reaches Zone 7. Please note, the 30-second effort may or may NOT raise your HR to Z7, but as the session continues it is likely to peak higher each time. Cadence is high (~ 100 – 120+ revs/min) during the interval, with a moderately large gear (e.g., 53 x 17 – 14). The aim of lactate tolerance intervals is to increase maximal aerobic power, VO2 max, anaerobic capacity, peak power, and are very beneficial.
FS - Flat sprints
Flat sprints are completed within a longer ride (e.g., LR, ET). On flat roads, and from your regular riding speed (the speed associated with Zone 2), using your race specific bike, accelerate rapidly to maximum sprint effort and hold the effort for 10 seconds. As you start the sprint get out of your saddle, and remain standing for the first ~ 5 seconds, whereupon you should return to your saddle for the remainder of the sprint. Use a moderate gear (e.g., 53 x 17), and aim to reach maximum pedal cadence as quickly as possible. Try to remain as smooth as possible. Recover for 5+ minutes at Zone Recovery, building to Zone 2, and repeat as specified. The aim of flat sprints is to increase peak power.